CLICK HERE FOR FREE BLOGGER TEMPLATES, LINK BUTTONS AND MORE! »

Friday, September 16, 2011

To Brood or Not to Brood

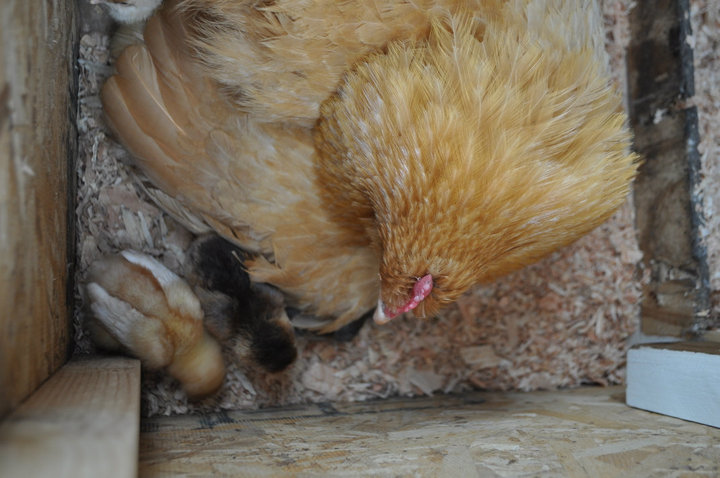
Meet Broody Judy
It is kind of late in the season to be letting one of our chickens go broody.  But I just couldn't resist. Broody Judy has been toying with the idea of becoming a mother for the past month.  She would act like she wanted to brood then change her mind.  Then a week later I would think she was ready and then nope.  Two days ago I found her sitting on 4 eggs in the hen house.  She stayed on those four eggs and allowed other hens to sit in her box with her then she would take those eggs and situate them under her body.  I checked on her at night and she was still there.  So yesterday I went to walmart and bought her a 30 gallon Rubbermaid bin, cut a hole in the side, layed some bedding and waited.  I didn't want to move her until night because I wanted to get her to accept her new nest.  JBody helped me move her and her clutch after dark and this morning she was still there.  I guess it looks like we are going to have some baby chicks in about 20 days or so. 


This is really exciting for us.  The last time we had a hen go broody she hatched about 12 eggs. That was our dear Mama Fluff. She was our favorite chicken.  She was killed by a hawk last spring.  We have since added 10 more birds to our flock since she hatched her eggs.  6 of them are Buff Orphingtons like she was. Broody Judy is also a Buff Orphington.  They are known to go broody.  We were just not expecting her to go broody at only 7 months old. 

Picture of mama fluff.  She looks like she is a cranky little thing.  But she actually was quite sweet. Her and her sister Zebra would follow us around the yard, when it was just the two of them.  She would let the kids pick her up and not peck at them.  She is still talked about with from the kids.
Mama Fluff with some of her babies.

We will keep you updated on Broody Judy's progress to Motherhood.

Thursday, September 15, 2011

Happy Birthday Emily! Another Chance to Win!

Remember I told you there would be another chance to win a cute birthday countdown?  Well I have made another countdown to be given away in honor of my friend Emily's birthday on the 18th.
If you haven't entered for your chance to win here on my blog don't forget to do so. Once you have entered here, head on over to Insanity Rules for another chance.  And while you are over there you can join her Birthday Bash and enter some other great giveaways in honor of her birthday.

Wednesday, September 14, 2011

It's My Birthday Week! {Giveaway}

In our house birthdays are a big deal.  I go all out on the cake for the kids.  I like to do pinatas, and banners, and do fun cupcakes for the kids at school.  JBody and I celebrate for the whole week leading up to the big day.  Well this year is no different.  No I don't make a cake for myself, or banners, and pinatas.  But I am celebrating here on the blog.  This year it is the big 3-0!  I am turning 30.  Last year I was not happy about this, but I am actually looking forward to leaving the 20's and moving into my 30's. 

To celebrate I have decided to host a giveaway.  Did you see the cute birthday countdown at the begining of the post?  I just finished making it.  And it is what I am giving away.  Well either this one or one similar.  I've made 2.  This one and one with similar colors.  The other will be given away too, but on a friends blog to celebrate her birthday!  That giveaway starts tomorrow.  You can try your luck with BOTH giveaways!  How great is that?  I celebrate and you get the present.  Good luck with the giveaway and don't forget to follow the rules.  Today's giveaway and tomorrow will have different rules.

To Enter:
Mandatory:  Tell me what you were or are excited or scared about turning 30. 
Remember to leave a way for me to contact you.  If your profile or blog page don't have your email then leave one for me in the following format (positivelypeaches at gmail dot com)
1 Extra Entry: Follow Postitively Peaches via Google Friend Connect
1 Extra Entry: Follow Peach of Cake via Google Friend Connect
1 Extra Entry: Tweet this giveaway and leave a link.
1 Extra Entry: Blog about the giveaway and leave a link.

Contest Ends on My Birthday: September 21st, 2011 at 10:03am (that is what time I was born)
I will do a random drawing and the winner will be announced (hopefully if all goes smoothly) the following day!

Sorry but entries are limited to U.S. addresses only.  I know bummer right?!

Be sure to comment seperately for each entry.  You must do the mandatory entry in order to do the extra entries.


I am so excited to share one of these with you.  It was fun to make and I love seeing it up on the self.  Yeah we celebrate 2 birthdays in September so it gets to stay up extra long. 

Stay tuned because Razy celebrates her 4th birthday this month and starting Saturday the 17th I will be posting a weeks worth of fun little girl hairstyles with a giveaway on her birthday! 

Wednesday, August 31, 2011

How to Can Peaches {tutorial}

First off I have to apologize for this tutorial.  It is a NON PICTURE tutorial.  For those of you who have ever canned peaches before you know how sticky and messy it is.  For those of you who will soon can for the first time, you will see why there are no pictures in this tutorial. So let's get started.
Before you Begin
The best way to can peaches is with a friend.  Trust me it makes the process alot quicker and enjoyable. JBody and I had about 100-125lbs of peaches to can this year.  There is no way I could have done it without him.

1. Start by putting your jars and rings into a dishwasher on the sterilize setting. If you don’t have a dishwasher, you can easily place your jars in your boiling water canner and bring the water to a boil for 10 minutes. I like to leave them in the dishwasher on heat dry until I am ready to use them. You can also place them in the oven at 250 to keep them hot.  Keeping your jars hot will prevent them from cracking when you add hot fruits and liquid into the jars.

2. Place the lids in a small saucepan and heat to a simmer, but don’t boil. You only need to do this for about 5 minutes.
3. Wash your peaches by rinsing in a colander. Use lukewarm water and be carefull not to bruise.

4. Place the peaches into a pot of boiling water and blanch for 30 to 60 seconds.

5. After blanching, place them into a ice water bath to keep them from cooking.

6. Then the skins should slip right off. You won't even need to use a knife. If they don’t slip off, you may need to put them back in the boiling water for 30 more seconds. If they still don’t slip, your peaches might not be ripe. Put a ripe banana in the box and check them the next day. The banana usually does the trick and the peaches ripen right up.

7. Cut your peaches.  We like cutting the peach into eight pieces.  You get more in a jar and it makes it easier for little ones to eat.  You can cut them in half, quarters, eights. If you are working with regular mouth jars you will want to at least quarter your peaches. 

8. This step you can choose to omit.  If you want to keep your fruit from turning brown you can use fruit fresh or lemon juice.  I did some with and then the second day I chose to skip that part. 

9. Pack your jars.  We cold or raw pack.  This means the fruit goes in cold or raw. If you want to hot pack, don't put into your jars quite yet.  When placing your peaches in jars, try to put them in pit side down.  This will allow you to get as much fruit into your jar as possible.  Pack tightly without squishing your fruit.  You will want to leave 1/2 inch headspace.

10. Prepare you syrup.  We like light syrup.  Kids get lots of sugar already and we don't think we need to pack alot of sugar into our fruit.  For our syrup we use 5 1/2 cups water to 2 1/2 cups sugar.  Put the sugar and the water in a saucepan and bring to a boil.  Once boiling you add the hot liquid to your jars. *** Here is where you will start your hot pack if you choose to hot pack.  You will want to boil your peaches in your syrup for 5-7 mins and then place the fruit and liquid into jars.

11.  If cold packing add your liquid to your fruit jars.  Fill to 1/2 headspace and then run a butter knife to get any air bubbles.  This will let the bubble escape and the fruit settle a bit.  You will probably need to add more liquid.  Make sure you cover all your peaches. 

12.  Wipe the rim of your jars to make sure there are no juices or fruit on them. Put your lids and bands on your jars. Do not over tighten your bands.  Just finger tight them.  What does that mean? Only use your fingers to tighten them.  When you involved your wrist the go on way to tight.  You want to allow air to be released. 

13.  Place your jars into your hot water bath. You water should be hot and at or close to a boil. Make sure to place your jars in one by one and opposite sides of the canner rack.  This will minimize tipping.  A canner rack can hold 7 pint or quart sized jars.  Once all jars are in submerge them into the water.  When water comes to a boil start your time. We process our jars because we are at a low altitude.  You may have to alter your processing time depending on altitude. 

14.  After processing time is up, remove your jars.  Place them on the counter and try not to move them for 12-24 hours.  During cool down you may hear a popping sound.  This is good.  It means that your jars are sealing.  After 24 hours, jars that still pop when the lid is touched mean they were not sealed.  Just place in the refrigerate and eat!

There you have it.  It really is not all that bad.  It does make a giant mess.  JBody and I actually canned outside on our camping stoves.  All the mess was kept outside and we had lots of room to move around. 

Thursday, August 25, 2011

Purple Cows

Is there anyone out there (other than my family) who has ever heard of a Purple Cow?

We told the kids the other night that we were going to have a purple cow for dessert.  We got some pretty weird looks and a bunch of "GROSS"es.  Little did the kids know that purple cows are a yummy treat.

I forgot about this treat, until recently.  While visiting an uncle, JBody and I were introduced to the Purple Cow Deliciousness.  So what is, and how do you make a Purple Cow.  Let me tell you.

GRAPE JUICE & VANILLA ICECREAM
Purple                                Cow


mmm doesn't that look yummy?!

Razy approval. 
Forget the rootbeer and bring on the purple goodness.

Wednesday, August 24, 2011

Pickling Beets {Tutorial}

Step 1- Selecting the Beets
The best beets are fresh beets.  Select firm, crisp beets.


Step 2: Trim the Tops and Wash your beets.
Just take a sharp knife or a pair of kitchen scissors and trim off beet tops, leaving an inch of stem and roots to prevent bleeding of color.

Step 3: Cook the Beets
Place beets in a large pot and cover with water.  Cook them until they are tender.  This depends on the size.  I did mine for around 20 mins. Drain and discard the liquid.


Step 4: Cool the Beets
Place the beets in a bowl of ice water.  This is to cool them off for handling.

Step 5: Cut Beets into smaller pieces
You can cut your beets into wedges, slices, or leave them whole.  You just want them small enough to place into your jars.

Step 6: Prepare your Pickling Solution


4 cups vinegar (5% acidity)
1½ teaspoons canning or pickling salt
2 cups sugar or Splenda
2 cups water
2 cinnamon sticks
12 whole cloves - about 1 tsp
12 allspice nuts (whole) - about 1 tsp

Place vinegar, salt, sugar, and water in a large pot.  Put spices into a cheesecloth and tie off.
***tip- baby food holders work great to hold your spices. 
Bring to a boil.
 
Step 7: Boil Beets in Pickling Solution
Add beets to solution and simmer for 5 mins. 

Step 8: Place Beets in Jars
(forgot picture sorry)
Add beets to clean, sterile, hot jars. I like to keep mine in the oven at 250 degrees until ready to use.  Fill your jars leaving 1/2 inch headspace at top.  Then add liquid leaving 1/2 inch headspace.  Place lids and bands semi tightly on. 

Step 8: Water Bath
Place jars in an open water bath for 30 mins. 

Step 9: Let Jars Cool
Cool your jars for 24 hours before removing bands.  Any jars that didn't process right, place in the refridgerator or eat.