CLICK HERE FOR FREE BLOGGER TEMPLATES, LINK BUTTONS AND MORE! »

Wednesday, September 21, 2011

Winner of the Birthday Countdown


Today is the big day to announce the winner of our Birthday Countdown Giveaway.  Thank you to everyone that entered.  I really enjoyed hearing all about your fears and excitements about turning 30.  So far I have had a wonderful 30th birthday.  I really have been looking forward to moving into the 30's club.  I am grateful to have wonderful friends and know amazing women that are in their 30's and beyond.  I will have to say that I do feel different.  I feel blessed to be where I am at at 30.  My 20s were fun.  I learned alot.  But in my 30s I hope to really enjoy the stage my children are at.  I hope to become a role model to those younger than me, so they see that turning 30 isn't as bad as they might think.

And the winner of the Countdown is...
Kim from Tiaras and Bowties

Kim I have sent you an email.  You have 48 hours to contact me or the prize will go to someone else. 

Three Braids to One {tutorial}

Maybe you could help me out with a name for this style.  Three Braids to One isn't that cool.  Well here is a way to get the side part french braid look.  I don't actually show you how to french braid on here, but there are awesome tutorials on youtube to help you out.  That is actually how I learned. 
1. Part the hair way off to the side. I like to pull the extra hair in the back and tie it off so it doesn't get in my way while I am doing this first french braid.

2. French braid the hair that you just parted and tie off with a rubberband.

3. Part the rest of the hair in the middle of the head.  Tie off the side that you are braiding first.

4. Using the first braid as a one of your three pieces, braid one half of the head. Tie off at the end. 

It will look somewhat like this once incorporated. 
5. Braid the other side.  You can leave it in french braided pig tails or go on from here.

6.  Combine both braids together and turn it into one braid.  This part can get to be a handful.  Work carefully as to not undo your french braids. 

Don't forget today is the last day you have to enter my Birthday Week Giveaway.  It ends at 10:03 AM PST.  If you missed it don't forget that Saturday I will be hosting a new giveaway in honor of Razy's Birthday.

Tuesday, September 20, 2011

Webbed Hair {tutorial}

Did you keep the rubberbands in from yesterday's hairstyle? If so keep it in.  If you are just seeing this thats okay you can start today.
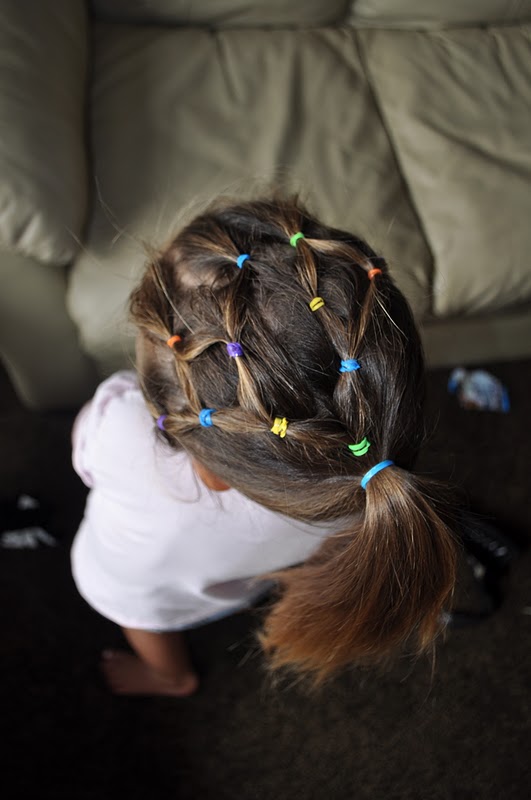
1.  Seperate the hair into 5 small sections and tie them off on top of the head with rubberbands. For the purpose of this tutorial I am using colored rubberbands to make it easier to identify the steps.

2.  Starting from one end take all of  the purple pony and half of the green pony tie them together with a rubberband.

3.  Take the half that is left over from the green pony and half of the blue pony and tie off with rubberband.

4. Continue this process until you get to the end.  You will add the whole pony at the end, like you did when you started. You should end with 4 new ponies.

5.  Make two new ponies by tieing two ponies together.

6.  Tie your two new ponies togetheer to create one. You could end here with the hair down.  However, we were going to soccer so we needed to get it up off her neck. 

7.  Grab all the hair and place it into one large pony.

Just because I think she is so cute with her hair pulled back, here is a front view.

Don't forget tomorrow is the last day to enter My Birthday Week Giveaway!
Stay tuned for another giveaway on Saturday for Razy's Birthday!

Monday, September 19, 2011

Rubberband Headband {tutorial}

Today's hairstyle is a quick one.  You will need 5 rubberbands.  Razy likes her colored bands for this one because she calls it rainbow hair. 
1.  Seperate the hair in 5 pieces tieing each piece off with a rubberband.  Leave it in tomorrow and I will show you how you can take it further.  
A front view.

Don't forget tomorrow to enter My Birthday Week Giveaway!
Stay tuned for another giveaway on Saturday for Razy's Birthday!

Sunday, September 18, 2011

Braided Shoelace Piggies {tutorial}

Today's hair style is going to can be done really easily by recycling yesterday's hair lines. However, you don't have to.  This tutorial is done without using the same lines, but know that if you did the Shoe Lace Piggies yesterday your lines are already made for you today.
1.  Part the hair in half.  I like a side part so I usually part her hair at the side and then part it in the middle.

2. On the top of her head place piggies on either side of the part. I use about a third or a little under a third for these first piggies. Braid each of these piggies.
 
3. Take about another third of her hair for this next step.

4. Cross the right top piggy and add it to the second third part of hair on the left side of head.  At this point you can tie off and then begin a new braid.  However, today I didn't tie it off and I just went to braiding. 
5. Repeat step four on the with the top left piggy.

 
6. Take the new left piggy that you created and add it into the remaining bottom third on the right side of the head. Either tie off and braid or just begin braiding.
 
7. Repeat step 6 with the right piggy.

Here is a look at the finished hair style.  Reminds me of a Pocahantas braid.

Don't forget, I will be posting a new hairstyle tutorial until Friday the 23rd.  Then on Saturday I will be hosting a giveaway in honor of Razy's Birthday!

If you haven't already entered, go enter my Birthday Week Giveaway.

Saturday, September 17, 2011

Shoe Lace Piggies {tutorial}

I don't know if you caught the end of my Birthday giveaway post that I would be putting up a weeks worth of little girl hairstyles in honor of Razy's Birthday.  Well her birthday is a week from today.  Yep my baby is going to be 4.  I love doing her hair and lucky for me she likes it too.  Many mornings I let her decide what style she wants.  If she says piggies I choose what kind of piggies but she get piggies none the less.  Same with ponies and braids. 
I am going to start off by posting a series of styles that work off eachother. The first is the Criss Cross Piggies.  We call them the Shoe Lace Piggies because they look like a shoe lace to me when they are done.
1.  Part the hair in half.  I like a side part so I usually part her hair at the side and then part it in the middle. You can kind of see what I mean from the picture below. (Excuse the cereal in the shot.  I do Razy's hair most mornings, before school, during breakfast.)
 2.  On the top of her head place piggies on either side of the part.  I use about a third or a little under a third for these first piggies.
3.  Take about another third of her hair for this next step.  
4.  Cross the right top piggy and add it to the second third part of hair on the left side of head and tie off with a rubberband.
5.  Repeat step four on the with the top left piggy.

6.  Take the new left piggy that you created and add it into the remaining bottom third on the right side of the head and tie off.
7.  Repeat step 6 with the right piggy.

8.  You can end here or go another step.  I think it looks super cute with curls.

9.  Curl each piggy and tie ribbons or place bows or flowers. Can you see the shoe lace look?

All ready for her first day of preschool.
Stay tuned tomorrow for a recycle of this hair style.