CLICK HERE FOR FREE BLOGGER TEMPLATES, LINK BUTTONS AND MORE! »

Thursday, June 30, 2011

Pizza Bites and 4th of July Treats


The other day on pinterest, I came across these yummy looking pizza bites and knew that the kids would love to try them out.  They were a huge hit.  I actually used the whole batch of Perfect Pizza Crust and it made a little over a enough for our family of 5.  I love pinterest.  I have actually completed a few projects by finding them on pinterest.  I have a bunch more to do, but I have to use my time wisely. 


PIZZA BITES
Printable Recipe

1/2 batch Perfect Pizza Crust dough
mozzarella cheese, about 20 cubed pieces
sliced pepperoni

For topping:
olive oil
Italian seasoning
grated Parmesan cheese

Preheat the oven to 400˚F. Lightly grease a 9-inch pie plate or cake pan. Divide the pizza dough into roughly 20 equal sized pieces. Take one of the dough pieces and press in a cube of cheese and two slices of pepperoni. Pull the edges of the dough down around the filling and seal. Place in the pan, seam side down. Repeat with remaining dough. Each piece of dough should be touching each other in the pan. (It may seem crowded, but will be fine.)

Lightly brush the tops of the dough with olive oil. Sprinkle on Italian seasoning and Parmesan cheese. Bake for 20 minutes or until golden brown. Serve warm or at room temperature, with dipping sauce if desired.
Source:  Thank you to Pennies on a Platter for posting this for me to see.


Remember those fun, easy treats we made for Valentine's day?  You know the ones.  The cute pink and white M&M, hershey kiss, pretzel treats.  Well I made them again.  This time using white candy melts, and red and blue M&Ms.  I love how patriotic they are.  Let  me remind you how they are made.  

What you need:

Hershey Hugs and/or Kisses
Mini Pretzels
M&M (for any occasion)

Lets Get Baking:
Preheat oven to 200 degrees
Line a cookie sheet with parchment paper
Place pretzels on cookie sheet and on each pretzel place a kiss or hug.
Melt chocolate for 2-3 mins
Take out of oven and quickly and carefully add an m&m or two.
Place in freezer for 5-10 mins to let settle.

So cute right?  They are addicting too.  I highly doubt they are going to make it to the 4th.  There is no way they can last 3 days in our house. 

Wednesday, June 29, 2011

Summer Blocks

Remember my Spring Blocks, I was inspired to make from Thoughts In Vinyl? Well she also has kits to make Summertime Blocks.  Yesterday I pulled my beloved cricut out to create my own set of Summertime Blocks.  If you don't have a cricut you can still make these blocks by visiting Thoughts in Vinyl and ordering her kits.  They are a great price and I love that you can keep them up for months at a time.  All you have to do is rotate the blocks.


Stay tuned...probably around September...when I will post my take on her Fall Blocks.

"Inbetween the Laundry" Accomplishments

Yesterday I told you that I was planning on getting lots done inbetween my laundry loads.  Let me just tell you that the 6 loads of laundry that were washed, dried, folded and put away were an accomplishment in and of itself.  However, I also was able to get some other things done as well. 

The first thing I was able to mark of my list was Razy's Room.  Awhile ago she got into her storage closet and pulled out a bag of clothes that she had already outgrown and a bag of clothes that she has yet to grow into.  She had them all over her floor.  She also had her dirty clothes mingled in with the others.  She and I were able to put the old clothes away, wash the new clothes and put them away and get the dirty laundry washed and put away.  Not only that, but I was able to go through her closet and pull out more clothes that she has outgrown.  

We Turned This....

Into This...


The first thing I was able to mark of my list was Razy's Room. Awhile ago she got into her storage closet and pulled out a bag of clothes that she had already outgrown and a bag of clothes that she has yet to grow into. She had them all over her floor. She also had her dirty clothes mingled in with the others. She and I were able to put the old clothes away, wash the new clothes and put them away and get the dirty laundry washed and put away. Not only that, but I was able to go through her closet and pull out more clothes that she has outgrown.

I don't have pictures to show of it, but I was able get the base part of our 4th of July pinata made. 
8 layers!!!  It is going to be a doozy to break. 

The playroom...the oh so dreaded playroom.  I sent the kids in there to clean while I worked on the pinata.  After being in there for about 45 mins by themselves and getting barely anything accomplished, I worked alongside them.  Sadly after about 45 mins working in there with them we only made a small dent and will be back in there today.  I told them it has to be cleaned by Friday so we can go watch Cars2.  Hopefully that is incentive for them to get it done.

Remember my Spring Blocks I made awhile back?  I finally got my Summer Blocks finished! Here is a sneak peak...

So those are the BIG things I got done.  I didn't count all the extras that we moms do during the day, everyday...
feed the kids,
clean up after the kids,
wash the kids,
play with the kids
and so on and so forth.

I really need to stop playing catch up and stay ontop of my laundry. 
Shanna has it figured out...
There are 5 of us in my family so I do the days laundry every night before I go to bed so I don't have laundry catch up days. After the kids are in bed, I throw the days clothes in the washer. Then I either watch one of my tivo'd shows, do some homework, read a book, etc. Then I throw it in the dryer and take my nightly bath and get ready for bed. By the time I am done, so is the load and I fold it and go to bed. Then once a week I only have a load of whites and a load of towels to do. I developed this system after realizing that all I do on my day off is laundry. No fun! :)

and thanks to Lynn who wrote...
So Shanna has an awesome system! My take on it? Well...instead of being even further productive while my washer takes care of the clothes cleaning, I usually end up on facebook or random blogs. Oh look, here I am! :) Can't wait to hear what you accomplished!

I am so glad that I am not the only one who gets sucked into the world of blogs and facebook, when I really should be more productive while the laundry is running.

Tuesday, June 28, 2011

Inbetween the Laundry

Today I am going to play laundry catch up a little.  JBody and I have plans to make two laundry dressers, but before we do so I want to catch up a little on the laundry.  Days spent doing laundry are no fun so I have decided to see how many things we can do and get done inbetween each load.  Stay tuned and I will share what the kids and I were able to accomplish today "Inbetween the Laundry". 

I would love to see what you get done inbetween your laundry.  Share with me a comment or link of what you accomplished "Inbetween the Laundry" and I will make sure to share it alongside what I accomplished. 

Happy Laundry Day...and then some.

Wednesday, June 22, 2011

Marvelous & Magnificent M&Ms

One last end of the school year gift idea for you.
This was really quick and easy to make.
What you will need:
Scrapbook paper to create your card
M&Ms
Ribbon
Create your card. I used my cricut to cut the m&m out.  I used Mickey Font at 2"*.
Punch a hole in your card.
Tie your ribbon. You want to make this tight enough where the M&Ms aren't going to shift around.
* No this wasn't created by MMMM, I just didn't wan't to expose the name.
Thanks to Happiness Is...for the original idea.

Teacher Crayon Monogram {tutorial}

I just dropped my little Kindergartner off to school for the last time as a half day student.  Next year he will be an all grown up 1st grader.  All day school...bittersweet.  I have really enjoyed Lil' E's Kindergarten teacher this year, as did he.  She had one of the largest Kindergarten classes I have even seen.  There were 21 children.  That's quite a lot to me.  The others had around 14ish.  We thought about moving Lil' E to the afternoon class when I found out the class size, but I am so glad that I didn't.  We will miss Mrs. Robbins.  I am hoping that if she ever moves into the higher grades to teach that Lil' E will get placed in her class.
Thank you Mrs. Robbins.

To Make your own crayon monogram you will need:
crayons ( I think new ones look best...I also like the classic colors)
scrap paper
scrapbook paper
hot glue
a sharp knife
lighter
shadow box

Print your letter out on a scrap piece of paper.
Arrange crayons over letter.
Cut crayons individually to length using a sharp knife and cutting board.*
Glue crayon pieces together using a glue gun.
Then glue the crayon letter to a nice piece of stiff paper.
Frame.

* DIY tip: A lighter comes in handy when doing this project.  Use it to heat your knife blade up to make cutting alot easier.

Thanks to Chic & Cheap Nursery for the original idea.

Tuesday, June 21, 2011

Have a Kool Summer

Today officially marked the first day of summer, but Lil' E is still in school.  He actually has one more day.  Yep tomorrow, my little kindergartner will be a big 1st grader.  We wanted to make a little end of the year gift fo the the kids in his class and when I came across this Kool Aid idea I rushed to the store to get my supplies. 

Supplies:
Cricut (I didn't have to rush to the store for this.  Many of you know I love my cricut)
Tags, Bags, Boxes, and More Cartridge (I wish I had this.  It would have made it so much easier.  Instead I had to search the web for an svg to use with my SCAL.  I found one, but I had to add the window myself.)
Glue
Scrapbook paper
Silly Straws
Kool Aid
Step 1: Cut a pocket tag using your cricut. You can only get two tags per 12x12 sheet. 
If you are using the tags, bags, boxes and more cartridge, cut the tag 1 out with a 9" window.  If you have the SCAL program you can use the file I created HERE.

Step 2: Assemble your pocket tag
.
Step 3: Insert your Kool-Aid into the created tag.

Step 4: Use glue or glue dots to close tag and insert your straw.

Step 5:  I printed the Have a Kool Summer out on the computer.  You could write it out by hand.

Step 6: Punch the Have a Kool Summer out.  I used a 1 1/4 inch circle.

Step 7: Back your Kool Summer circles with colorful paper.

How cute are these?  Lil' E can't wait to take them to school tomorrow. 
Thanks to Fakin' It for the original idea.

Sunday, June 19, 2011

Daddy We Love You Because...

Happy Father's Day!
There are many reasons why we love our Daddy.  The kids share a couple in the collage below, but let's share a couple more with you.
Daddy We Love You Because...
  You always tickle us,
You always hug us,
You are our best buddy,
You are funny
You are always nice to us,
Love, Lil' E, Doble, and Razy
I should have gotten a picture of this framed, but JBody already took it to the office.  I found the "Daddy We Love You Because..." download at Positively Splendid.  She had this cute idea for Father's Day and I thought it was adorable.  The kids each told me why they loved daddy and then we wrote it onto the black paper.  Over at Positvely Splendid she walks you through the process of creating a collage if you don't know how to make one.  If  you do it quickly you can get this printed and framed in no time.  Even quicker if you print it off yourself and already have a frame.  Happy Father's Day!

Saturday, June 18, 2011

Dog Collar Boutique {Product Review}

Recently we were asked to do a review for a company called Dog Collar Boutique.  We were given a perfectly pink little dog collar.  The collar is from the Coachdog Collar Collection.
I love this little collar.  It looks like it is going to last a long time.  In the past we have had our leather collars get really worn out and break.  This one is made from a good thick leather type material.  I love the little added touch of the dog bone charm.  Isn't it so cute?  And it comes in two other colors; hot pink, and aqua.
What else does Dog Collar Boutique carry?  Let me show you.

How cute is this harness?  I love the cute little flowers with the added rhinestones.  Bella needs one of these.  She is one of those little dogs that doesn't walk on a leash very well.  She likes to pull us and when she does she chokes herself.  The harness would eliminate the annoying chocking sounds.


If this isn't stylish I don't know what is?  All of their retractable leashes have just the right touch of style and charm.

Our little Bella loves to be with us all the time and although we don't do much boating...well we do no boating.  But if we did she would be sporting this cute little polkadotted life jacket.  Well she would if I had a say and bought it undercover without the knowledge of JBody.  He would think I was silly making a purchase like this. But our doggies need to be safe too.

Just like our kids need toys, so do our pups.  Bella has even been known to claim Razy's toys as her own if they are left out.  Her favorites are teddy bears and plush toys.  Dog Collar  Boutique has many different plushes to choose from. 

So whether you are looking for a collar, a harness, a retractable leash, a life jacket, or a toy, Dog Collar Boutique will have it for you. 

A photo or two to leave you with.


I couldn't get a good picture of Bella and her new collar.  I really need to get her hair cut.  Maybe when I do I can get a good picture that shows off her new leash. 

Wednesday, June 15, 2011

Monster Journal {tutorial}

We just finished making monster journals to go along with our monster bookmarks. I really wanted to go homemade for this birthday party that Doble is going to this weekend.  Not that I am cheap...(I am though), but because I wanted to stick with the theme of the party.  I found a cute tutorial on how to make monster catcher journals and had to try them for myself.  The kids saw me making one for the birthday boy and they each insisted on having one of their own.  They each helped design theirs.  Lil' E actually designed his all on his own. 

We have a mess in our living room, but they are all having fun talking about monsters and drawing pictures and writing stories about playing with monsters.  It is actually quite cute.  I love that Lil' E is actually trying to write the story himself and is sounding out words and creating his own sentences. 

How to make your own monster journal....

Supplies:
Compostion note book,
 Fabric: Furry, Fleecy, Textured, ect.
Scissors
Hot Glue and Gun
Embellishments: Googly Eyes, Foam, Felt

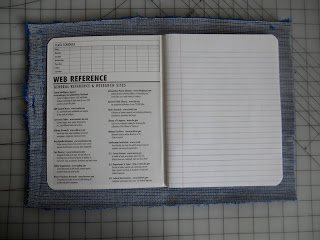
Step 1: Cut your fabric (about 11.5 inches x 17 inches) and lay under your composition notebook.  You should have about 1 inch around the whole notebook.

Step 2: Hot glue the spine of your notebook to your fabric.

Step 3: Cut a notch from each corner of your fabric to it makes it easier to wrap around your notebook.

Step 4:  Using hot glue, glue all edges down around notebook.  At the spine you may need to cut another notch to make it easier to close your notebook.

Step 5: Add your eyes, teeth and mouth.  We used the foam for teeth and felt for mouths.  Of course our little girl monster had to have a bow. 

They are so excited about their new journals.

You could easier use this method to customize a composition to look any way you would like.  I actually thought it would be cute to just cover one with a cute cotton fabric and embellish with buttons, flowers, ribbon, ect. 
Happy Crafting!!

5 Fun and Creative Reading Activities

Can you see where my focus is this summer?  I really am hoping to sneak some reading opportunities into the kids' summer.  I found a few fun ideas that I wanted to pass along to you.  These can be catered to your child's level of learning.
@ Filth Wizardry
I can't wait to put these together for the kids.  I think they are perfect for them.  The spellers can help Doble sound out and create words.  The Sentence Duplos can help Lil' E move onto creating whole sentences.  Now I just need to get my hands on some Legos.


@ about.com
 Be adventurous and make it a game as to where you should read to your child and how. In warm weather, read next to a pond or lake, under a tree, by the pool, or even in the tree house. Be bold and carefree. One mother reads to her young child in their blow-up children's pool in the backyard during the summer months. Another mom finishes the much-anticipated daily trip to the park in the spring or fall by reading a book before they leave. Cold months can mix reading activities by having books about snowmen, snowfalls, winter holidays, or sports such as ice skating. Day care centers or child providers can add reading fun into the mix by tying it into a planned activity for the week. If the theme for the week is "Under the Sea," then the books can be about the ocean or fish.


@ Teach Mama
At the begining of the school year we made this game for Lil' E taking all his sight words.  I searched the web to find a tutorial to share with you so I didn't have to repost it.  Works perfectly because not only do you see how to make and play Sight Word Memory, but you now have a great resource in Teach Mama.


@ Teacher 2 Mom
Lil' E brought home his school journal a couple weeks ago and has been taking it along with him everywhere.  He loves to write in it.  I have been so impressed with his ability to sound words out and write his own sentences without any help.


@ The Snail's Trail
I love this simple game you can create for your preschooler.  Most of us have magnet letters laying around the house and this can be easily made.  What a great way to introduce letters and short words to early learners. 


Tuesday, June 14, 2011

Monster Corner Bookmarks {tutorial}

While searching for a cute gift idea to make for a monster birthday party the kids and I came across these Monster Corner Bookmarks.  They were so simple to make that we made the birthday boy 3 and made each of the kids one of their own.   {The original idea came from I Could Make That}

What you’ll need:
pretty paper of cardstock weight OR a combination of plain cardstock and pretty, decorated lighter weight paper
scissors
ruler
glue stick
[optional] other decorating tools, such as crayons, markers, stamps, stickers, ink pads, embossing powder, etc.

Let's get crafting


1) On a piece of white cardstock make your template.  Using a ruler draw a 2.5 inch x 2.5 inch square.  You can go a little bigger, but this makes a very good size.  Draw second square exactly the same size on the right side of the first square (so they share a side) and a third square exactly the same size on the top of the first square. You should end up with 3 squares that compose an L shape.

2) Using your ruler, draw a diagonal line across the top left square, from its top right corner to its bottom left corner. Scribble out the upper left half (now a triangle) of the square, as you won’t be using that part.


Next, draw a diagonal line across the bottom right square, from its top right corner to its bottom left corner. Scribble out the lower right half (now a triangle) of this square.


3) Cut out all parts, but your scribbled out triangles.  This will be your template.

5) Trace your template onto the piece of cardstock that you intend to use for your bookmark (sorry mine is so light)

6) Using your ruler,score a line (make an indent) along the edges of the square that connect to the two triangles.  After making this once by scoring I actually just carefully folded it.


6.5) [optional] Cut a slightly smaller square than you used for your template from a piece of printed paper. Glue the square into the square portion created by your template.

7) Fold one triangle inwards, so it covers the upper half of the square.


8) Apply glue to the underside (the side still facing up) of the second triangle, and fold it over onto the first triangle.


8.5) [optional] As in step 6.5, if you’ve used plain cardstock and want to glue a matching top, cut a triangle slightly smaller than the template triangle using the same paper you did for the square.

9) Make your embellishments. We went with teeth and eyes.  For the eyes I used my creative memories 1 inch and 3/4 inch circle punches, then freehanded the black pupil.


9.5) The teeth were made by making another 2.5 inch square (or whatever size you made your template square). Draw a diagonal line from one top point to a bottom point.  Then freehand zig zags for teeth.


10) Cut out your teeth and put glue onto the triangular portion.  Then slip into your bookmark and glue to the top triangle.
11) Add your eyes and you are done.


I Could Make That has 2 other ways to make corner bookmarks.  Stop by her blog and try them out.  They are similar to this one, without the monster touch.